Tuesday, January 28, 2020

Who left the Window Open?

Image result for smoke pencil at window

I have been to 4 homes in the last 2 weeks to look at jobs.
Guess what? Every single home had a window left open. When I asked the owners if they realized it, they said no.

Here's why it is important to check them. On every occasion, the owners did not recall when they opened the window and said it could have been open for 2 or 3 years since they last had the house painted.
One person said, "we've owned the house for 5 years and neither of us have checked to make sure the windows work correctly..."..... guess who gets the first call when there are window issues?

Check your windows now before pollen makes its way in.... or bats, squirrels, you name it!

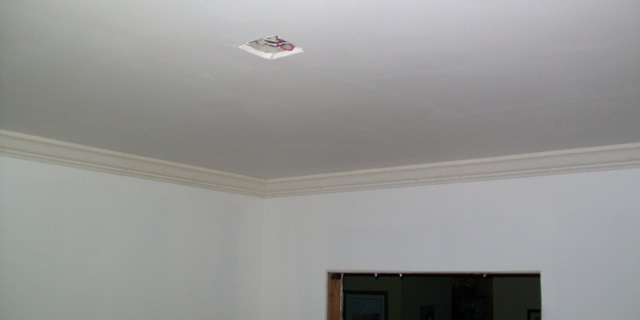
On one occasion about 4 years ago in July, I went to a home where the client needed the living room ceiling repainted. That was it. It was a tray ceiling with 4 can lights. They had a small amount of mold. So I educated them on  air sealing the can lights to keep attic air from being sucked into the living room from the HVAC system. They didn't want that upgrade. So I did my work and 2 weeks later they were back in town and now the ceiling looked like it was raining with moisture on it like your bathroom walls look when you forget to turn on the shower. This happened because I used a primer sealer intentionally to seal that drywall.  They had an HVAC contractor there to "replace the old duct work because that was causing the moisture problem in the living room."
These poor people were scammed.

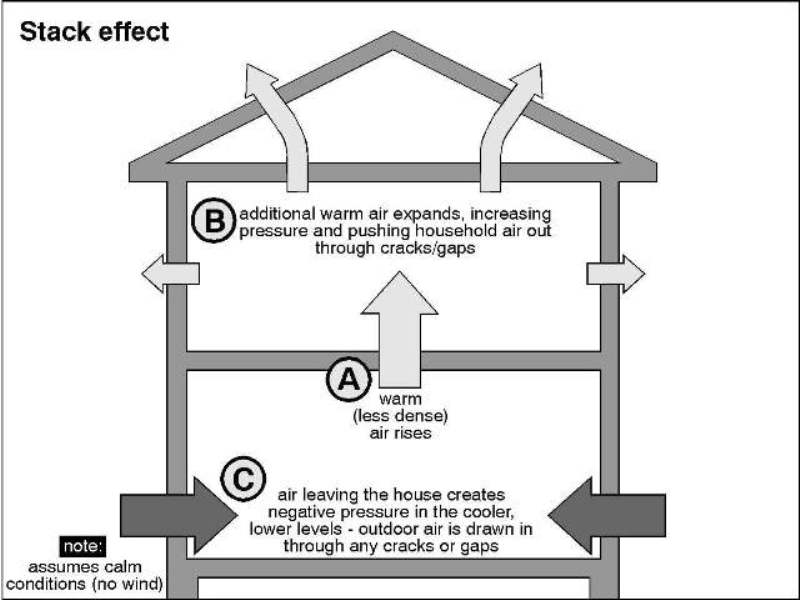
I asked the owner to walk around the outside of the house with me... They said the master suite seemed to be uncomfortable and the new duct work would help. I explained it was a good investment but not the solution to their problem. We looked at the windows to the master bedroom.... 2 were open at the top about 1 inch. I told the owner-- that is causing the moisture and comfort issue. We walked around more and found 2 more windows open in the guest bedroom. The back patio door was not weather tight. Next day I came back with a smoke pencil. He said the duct work made a difference because there was no moisture on the ceiling. I said- no- yesterday we closed the windows, THAT is the difference and his wife thought I was insulting them because they had spent $4800 to replace duct work.... I explained not at all.... then I showed them what happens when you turn on the HVAC system with a window open, using the smoke pencil...
Go to 2:30 to see how a smoke pencil works.

Smoke Pencil in use at 2:30

We opened a window, turned on the HVAC system. The Tray ceiling was the highest ceiling in the house and it was 5 feet  from the patio door that was not weather tight. Guess where the smoke went? Into the tray ceiling.  The tray ceiling was between the patio doors and the return air grill..... After that, I was asked to check and air seal all the doors and windows, receptacles, and any other areas in the home that may leak unconditioned air into the home.  Apparently their power bill dropped down to half of what it was in June and July....After that, I was asked to renovate their guest bathroom and do more work.
Very Nice couple.

So- check your windows! Your house will thank you!
You're Welcome......


Tuesday, January 7, 2020

How To Get the Most for your Painting Dollar....

As we start the New Year, many of us set goals for our families and homes.
One of your goals this year might be to repaint some or all of your home. What you really want to make sure is that when you're getting estimates to paint your home that everyone's going to give you a price for the same exact work. This will allow you to compare apples to apples. Each contractor that gives you an estimate should follow all of the same steps when giving you an estimate to complete the job. You can be flexible as far as the product manufacturer they use, because most paint contractors have a preferred brand. I prefer to use PPG and Glidden becausevthe supplier I buy from is locally owned. In 20+ years as a contractor i have never felt compelled to change from this supplier. They give back to our community in unprecedented ways compared to all other paint suppliers.  I buy from Hilton Head Glidden. 
Every paint manufacturer makes the same 6000 colors. Some of which claim to be proprietary colors and they are by name. However science dictates that there are only 6,000 colors and any paint manufacturer can make any other manufacturers color to an exact match.
Step 1 choosing a color. Rarely do I consult on colors as an applicator because the homeowner would come back to me if they don't like a color and tell me that it's my fault for picking it or recommending it. So I recommend that if homeowners are able to select their own colors, they contacted an interior designer to do a color match or develop a color palette for them. Typically something like this can be done for about $125 and maybe well worth it if you have a big home to paint. More importantly I think it's worth it because you have a professional that works with colors and textures everyday.
Step 2
Scope of work:
The scope of work for your paint job should be the same for every person providing a price.
1 protect all surfaces and furniture
2 Use a 500watt LED work lamp in work areas. Clean all walls trim and doors .
3 fill holes, repair drywall, remove loose caulk as needed, and sand and prep all walls, trim and doors, clean dust from all surfaces, using a vacuum, damp sponge,  or tack cloth.
4 caulk and fill cracks as needed
5 apply paint to ceilings 1st, trim and doors 2nd, walls 3rd, using spray, brush , and/or roller with 3/8" to 1/2" nap.  Clean loose fuzz from roller prior to rolling walls.
6. Remove masking materials and surface protection and vacuum or mop once as needed for flooring.
7 Label all paint for location and date and place in stirage at owners home.

These are pretty easy steps to follow for every paint contractor to make the job very simple . Keep in mind that sometimes the scope of work will change when we find an area where a wall has some type of water damage and paint starts to peel. But this is your basic scope of work that you could use with any contractor. Good luck and look forward to hearing your questions!


Saturday, January 19, 2013

Crown isn't just for Kings and Queens!


Crown isn't just for Kings and Queens!

Step 1: Hire a good helper- see him there on the right?


Step 2:   Once you layout your crown, cut and cope your crown


Step 3:  Install your crown


Step 5  Install the crown so the existing piece is nailed in the corner after you have the new piece fitted tight with the coped edge.

Step 6   Fill and caulk the crown. When caulking, use an elastomeric caulk like I do. It allows for movement without cracking.


Step 7 Paint with a high quality no VOC semi-gloss paint, like Lifemaster from Glidden.


This project to install crown in 1 room, 4 walls, took me 30 minutes alone. Not including set-up and tear-down time for all equipment.

Budgeting: Expect to spend $6 to $7 a lineal foot for crown installation done correctly.

If you are looking to add something to your home, Crown is the way to go. Looking to sell? As far as inexpensive updates, installing crown molding and painting give you the biggest return on investment behind replacing your front door. Front doors are what I will talk about in my next post!

Need a price?
Email me at lcfhhi@gmail.com
Call me at 843-298-3412
Check out my webpage at www.lowcountryfinishes.com


Sunday, January 6, 2013

Stop Throwing Money Out the Window in 2013!

Happy New Year!

In 2013, I resolve to Reduce this Stack Effect..................


AND increase this Stack Effect..............


Now that it is winter time, do you notice a little draft in the house? I do! 
I have new Energy Star windows in my house because the old ones were destroyed and didn't work. The attic lacks appropriate insulation and I am pretty sure all 16 of my can lights leak air from the attic badly! Winter is a good time to notice the performance of your home's insulation and whether or not it needs some attention sealing the air leaks.
The last project we worked on, we reduced air leakage WITHOUT SPRAYFOAM by over 40% and reduced humidity by about 15%. That is a big difference in August. That's the difference between comfortable and stuffy.  While many people swear by the performance of sprayfoam insulation, you are wasting  your money by not testing your home before and after, to ensure you are getting what you are paying for. 

For more information about this work, please contact David Cook at Lowcountry Finishes at 843-298-3412 or  email him. I work with Elm Energy Group when analyzing a homes performance, and we use his recommendations to get your home performing better with baseline testing to use as a guideline. I rely on Jamie Kaye with Elm Energy Group for that service.

Putting money into sealing your home, will actually pay you back, almost, forever. Call me to discuss how we can save you money and give you a more comfortable home.

Happy New Year! 


Friday, September 21, 2012

Popcorn ceilings.... Remove or Repaint?

I am writing this blog to help you make a tough decision easy. What should you do with textured ceilings?
(AKA Popcorn ceilings) Remove? Or Repaint?

First- take a look at this photo..........  BEFORE.. you can see the stains and repairs....
Textured Ceiling skylight. This becomes a home for nothing you want to keep. Seriously, there were so many spider webs in this skylight I wasn't sure what was coming down when I scraped it, texture or spider webs.


Step 1 cover anything you do not want to get ceiling texture on
Step 2 put on a dust mask, spray your removal medium, either water or some mixture of water and tsp, or anything that will help break the bond from the sheetrock
Step 3 put on a dust mask, again.... quick sanding, remove dust and mud tape joints and nail holes
Step 4 dust mask please again!........ sand smooth with sanding pole or sanding pole attached to a vacuum, but never a sanding sponge... you could spend all day.... besides, it won't sand the ceiling flat. Only a pole sander works faster than anything else....

The removal process looks like this......  in a different part of the house..


 DURING........... texture removed, and tray being prepared for new tape joints......

Now for the AFTER photo of this skylight. With new glass! Looks like a new house. 

By the way-we did this entire house, removed ceiling texture throughout. What a terrible project this one was. They had several roof leaks which resulted in the texture being locked on to the drywall. We handled it the simplest way, but it was tough work.
This is the Great Room tray ceiling we stripped..... you can see the tape let go because it had 1 coat of mud on it. If you have a home that has a tray, do not be surprised if this happens. If you are planning to do this project yourself, I would leave the taping and finish work to a professional in the tray. This is very difficult and requires a lot of skill and patience. Worth every penny to pay a drywall specialist to do it. Even I pay them to do the tray ceilings! I do the flat parts because I really move pretty fast there. The angled tape joints you see here are brutal to work with.


This is what the tray looks like once we finish applying 1 coat of primer sealer and 1 coat of No VOC Glidden Lifemaster Flat paint.


Lastly, as a homeowner you decide when you buy a place, as to whether or not you want to do this. It is a lot less expensive to remove ceiling texture when the house is empty! So is painting! 

REMOVE: in an empty home...........
This project bid was on a 2000 SF ceiling space, which included re-taping the skylight, the tray, and 2 other areas of angled ceiling... The labor came to $3.00/square foot or $6000 labor. Materials were about $1,000.  $7000. Never worry again about the textured ceilings. In this area, smooth ceilings is an upgrade for your health and makes your home more attractive when listing your property. I expect your health will improve once your ceiling texture is removed.

REPAINT:
 Not including walls- the price for these ceilings to repaint after masking everything and the walls $1250 plus materials of $750. With the caveat that some texture may fall down during the process, which we do not know  until it happens. Also, you will still have texture ceilings and still have to deal with how little the light reflects off the texture.

This project compliments of Chip Collins of Collins Group Realty. If he didn't call me to repaint this home for his client before being listed, I never would have called my client to come and see it; and eventually buy it; and hire us to do this work and a few other projects. Thanks Chip! 

REMOVE?  or REPAINT?
You be the judge! Removing your ceiling texture will definitely get rid of years of cooking, dirt, and who knows what else?!

Don't forget to share this blog with anyone you know. If they are selling their home or buying a home and the texture looks pretty bad, this is the best option.......  Most bang or the buck in a house is removing texture and painting! Biggest impact!
Call me for more information about removing ceiling texture... Dave Cook, 843-298-3412. 
or  email me! at lcfhhi@gmail.com. 
You can also visit my website at Lowcountry Finishes Painting and Carpentry

Next Post..... 
Crown... It isn't just for Kings and Queens!  Will it cost me a fortune to have it installed and painted?


Sunday, August 26, 2012

SHABBY WALL- GIVE ME A CALL! Wallpaper: remove, prep, and paint, surgery it ain't!


A recent project I came across was with a client asking me to remove wallpaper which had been painted over 3 coats and sealed to the wall. He asked for the least expensive solution. Asking me to price new drywall over the top, removing the painted over wallpaper, and skim coat over the existing surface of painted wallpaper. We went over the heavily patterned wallpaper again and at a cost much greater than if he had spend the extra money initially to remove the wallpaper and then paint. This can not be done all the time.

So addressing the question, which is more cost effective? Remove wallpaper or paint over it?

When faced with this decision as a homeowner,  the best money spent, one time, is to remove the wallpaper, with one caveat.  Be prepared to allow the contractor to do a test area of 2 or 3 pieces wide by the hour to make sure the paper will come down without pulling the paper off the drywall. This would only take 1 hour if the wallpaper comes down without a problem.


When not installed correctly, wallpaper will become one with drywall. Even the best wallpaper removal concentrate and most skilled tradesmen, may have problems. You also run into the problems if the paper starts to fall off in some areas. You may also trap mold behind the wallpaper. This could cause health problems later.

Once I remove wallpaper, I use Gardz Problem Surface Sealer. It is a low odor water clean-up product. But you do have to allow it to dry completely before the next step. This will seal ripped drywall paper, and wallpaper glue you may have missed, without having to use an oil base offensive product like Kilz or Cover Stain. It can also be used as a primer. Last time I used this was as an initial primer,  I skim coated walls, and primed with it again to lock the drywall mud to the first coat of sealer. I finished the walls with 2 finish coats of a no VOC flat wall paint to help hide imperfections.

DIY Alert:   Save wallpaper removal for the professionals. You can do the prep and painting yourself, but  let a pro remove the wallpaper and handle the intial removal of glue before applying a skim coat and a sealer.

Removing wallpaper can become ovewhelming as a DIY project. Painting that wall area later, once you let a professional remove and prep the area is easy. Hire a professional to do it for you.

Spoiler Alert: While removing the wallpaper- have the crew take down that nasty, smelly popcorn ceiling too! This is the easiest time to do it and chances are, in that space, they will do it for half the normal cost because they are already in there working on the walls, and the floors should already be covered and prepared in the work space.

Next Topic: Removing textured ceilings.......... wait until you see the difference!

Remember: IF you've got a SHABBY WALL, GIVE ME A CALL!
Dave Cook
843-298-3412

Wednesday, August 22, 2012

A step into the Remodeling Culture!

As my first blog, I have to consider, who will read this and what do they want to learn? I am open to suggestions and for the first week- I am opening this BLOG to the public and their curiosity. The topics you want to learn about may be
1 Painting-interior and exterior
2 Carpentry=framing vs trim work
3 additions and renovations
4 windows and doors
5 DIY Coaching- help me, I am stuck!

I am confident my experience in construction will create a local demand for information relating  handling renovations, how to talk to and work with their contractor, and how to get the most from their remodeling dollar! We ALL want that! Including me! As I am currently looking to add a bedroom and a nice laundry room with a toilet and shower, so I am able to come home from work and leave dirty clothes in the laundry room, instead of our walk-in closet.

If you have questions you want answered, there are many ways to reach me
I am available to be a DIY Coach. A DIY Coach helps you move through your own work at your home which you want to provide the labor and are capable, but need some guidance. The best way to reach me is email at lcfhhi@gmail.com, explaining what your goals are and what you are working on.
I am a licensed South Carolina Residential Builder if you have a project you would like me to review, consult, design, or work on for you. It is best to reach me at 843-298-3412 on my cell phone.


This would be very helpful during your preliminary stages of renovation, before you have a definite plan.
You can see a very large photo gallery on http://www.facebook.com/lowcountry.finishes.

Please contact me if you ever need anything! I look forward to hearing from you.
Next Post: Aug 25th, 2012

Kindest Regards,
David Cook
Owner, Lowcountry Finishes Painting & Carpentry
www.lowcountryfinishes.com
843-298-3412